The Media Library
Click on a section title to jump down the web-page:
E. Media item tags and Scripture references
F. Media Library screen – other features
G. Media library – grid display
H. Media library – usage display
I. Media library – media duplicates
A. Introduction
1. This is a detailed chapter about adding files to the Media Library, making them available to be published and used on your website.
2. The upload process is very similar for most media categories. In Section B, we will use Audio as an example and include specific notes where the process is different for other categories.
3. In Section C, we will cover how to create a media item for a Remote video.
4. File formats and maximum file size allowed for different categories of media:
a) Audio – mp3, wav; 2GB
b) Video – 3gg, 3gp, avi, dat, flv, m4v, mov, mp4, mpeg, mpg, ram, rm, swf, wmv; 2GB
c) File (including fonts and applications) – 3gp, aac, apk, avi, bloomd, deb, dmg, epub, exe, fb, fb2, fcbh, gif, ipa, ipsw, iso, jad, jar, jpg, jpeg, kmp, kmx, mobi, m4a, m4v, mp3, mp4, mpg, mpeg, mybible, odt, ods, odp, otf, pdf, png, pps, ppsx, ppt, pptx, ttf, txt, wav, webp, woff, xsm, zip; 1GB
d) PDF – pdf; 300MB
e) Images – png, gif, jpg, jpeg, svg, ico; 16MB max. file size; 12,000 pixels max. in either dimension
B. Add a media item
1. IMPORTANT: To successfully add a file, you must complete all steps in this section before navigating to another part of the Wildfire system.
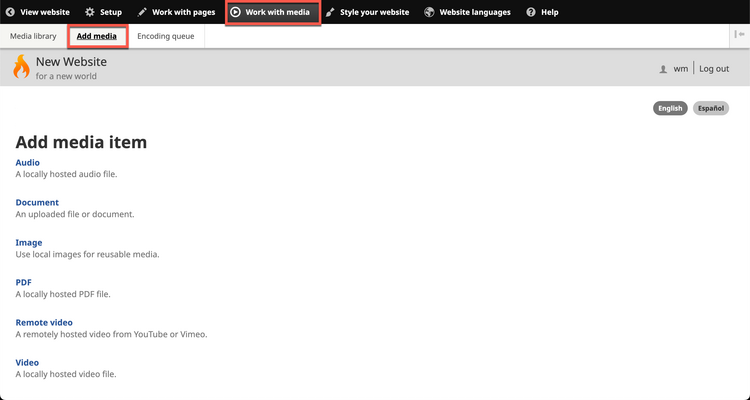
2. On the Wildfire menu, click on Work with Media, then click on Add media.
(Note that when you hover over sub-menu item Add media, a drop-down list appears of six specific media categories. These are the same options as those on the Add media screen. You may click on an option on the drop-down list as a short-cut to upload that media category.)
3. The Add media item screen appears, with a list of six categories of media you may upload.
4. Click on one of the links. We will use Audio as an example.
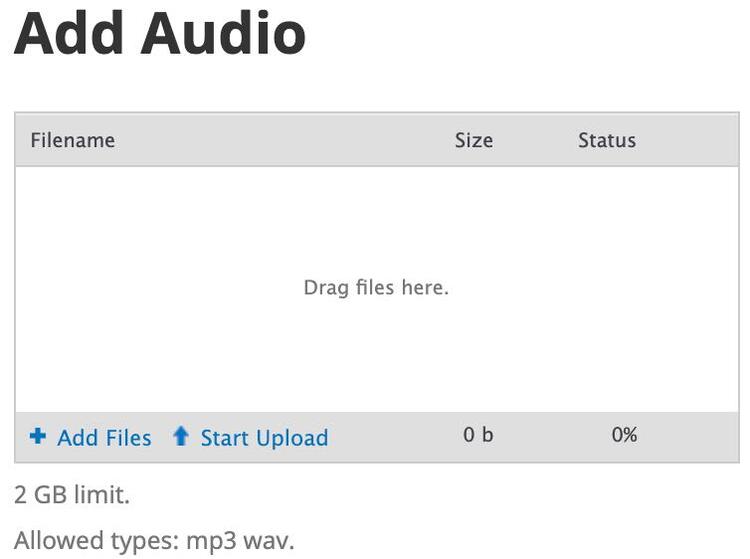
5. On the next screen, use the upload box to search for and select files from your computer.
Below the upload box, you are reminded of the maximum file size (per individual file) and the allowed file formats for the media category chosen.
a) Click on the link +Add files at the bottom left of the gray frame.
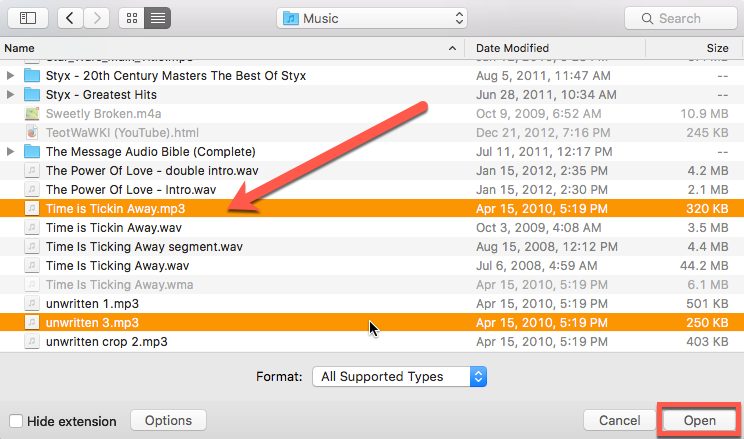
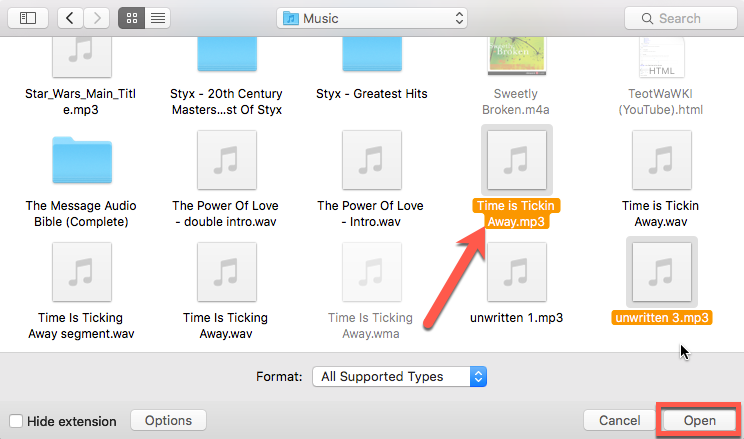
b) A file browser window opens showing your computer’s file system.
(Depending on your computer settings, you may see your files in either list mode or icon mode, as shown in the following images.)
c) Select one or more files.
d) Click on the Open button.
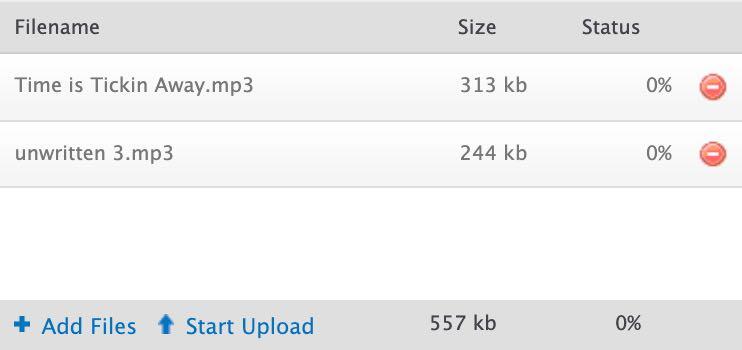
e) Your files are now listed inside the gray frame.
f) Click on the Start upload link.
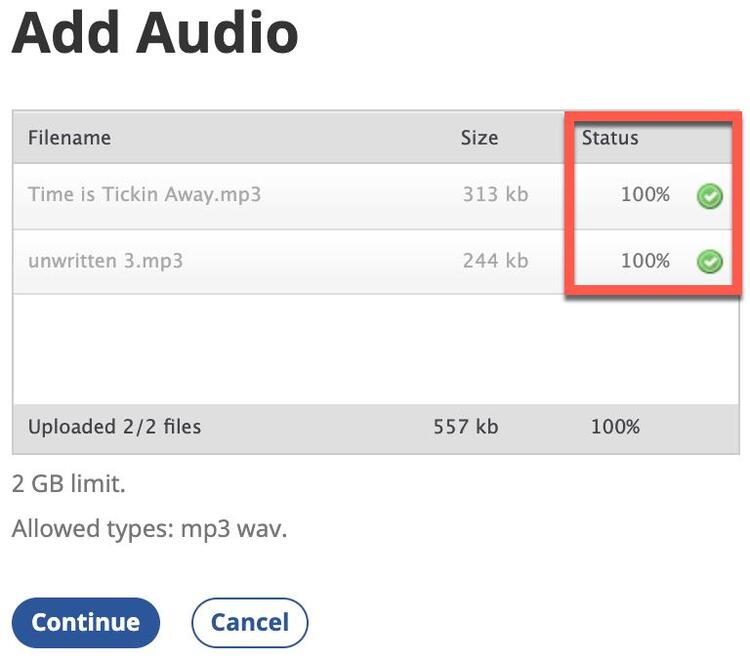
g) Files will have a green dot with a checkmark once they are uploaded successfully, and the Status will be 100%.
h) Click on the Continue button.
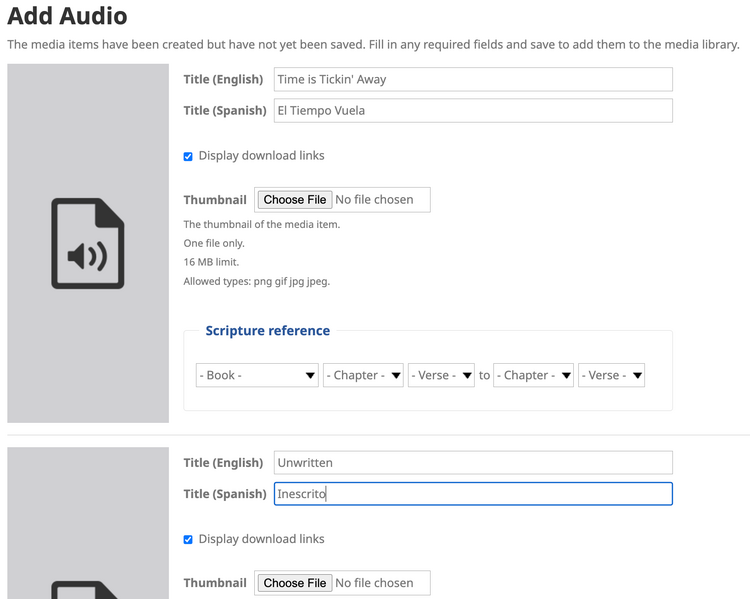
6. At the next screen, prepare each media item for display on website pages and in the Media Library.
a) Write a short and clear public title for each item in each Navigation Language.
b) A thumbnail image is not necessary, but it DOES add graphic identity to the media item on a website page.
To add a thumbnail image:
1) Click on the Choose File or Browse... button.
2) In the pop-up window, select an image from files on your computer, then click on the Open button.
3) The thumbnail image will be uploaded and displayed on the screen.
c) Uncheck the box if you do NOT want to display download links beneath the media player.
d) If a Scripture reference is appropriate for the media item, click on the drop-down lists and select Bible Book, beginning Chapter, beginning Verse, ending Chapter, and ending Verse.
e) In the space titled Tags, write one-word labels that identify the media item, separating them by commas. (These will help you later to search for the item in the Media Library.)
f) Image files require alternative text – a brief description of the image that will be used by page readers for the visually impaired.
g) There are also links to crop and rotate image files after they are uploaded.
h) If you uploaded several files at the same time, scroll down the screen to find and process all uploaded items.
i) Click on the Save button at the bottom of the screen.
C. Add a remote video item
1. IMPORTANT: To successfully add a remote video item, you must complete all steps in this section before navigating to another part of the Wildfire system.
2. You may add a video hosted at any of the following services:
a) YouTube
b) TikTok
c) Vimeo
d) Livestream
e) X (formerly called Twitter)
3. Adding a remote video to your Media Library creates a streaming link to the video at the other website; you are not actually storing the video at your Wildfire website.
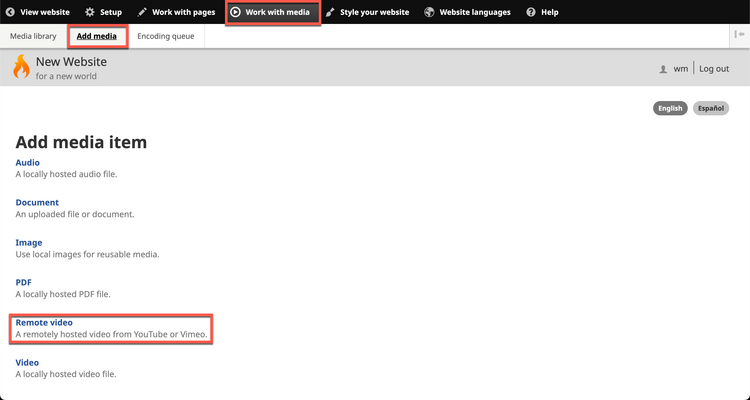
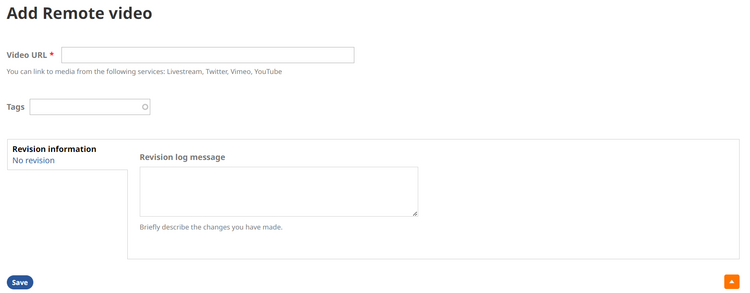
4. On the Wildfire menu, click on Work with Media, then click or hover on Add media, then select Remote video.
3. At the next screen, you are asked to supply the URL for the remote video.
a) Copy the remote video share link or URL from the app or website.
b) Return to the Video URL screen on your Wildfire website.
c) Paste the link into the field.
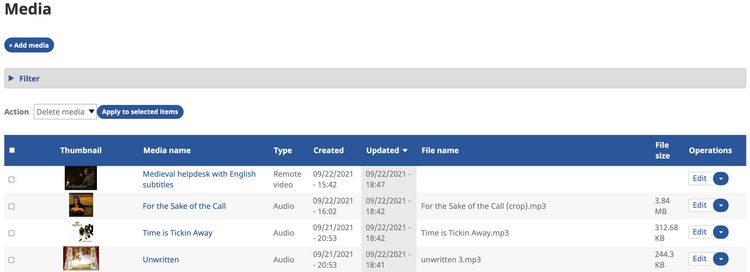
2. Items appear in the order they were uploaded, with the newest items at the top of the chart.
3. Columns on the Media Library chart display, from left to right:
a) Thumbnail – a small image for audio and video items (if added) or a miniature of image files
b) Media name – the public name for the media item
c) Type – the category of the media item
d) Created and Updated – reference dates
e) File name – the original file name of the root file (not visible to the public)
f) File size
g) Operations – a drop-down list of actions
1) Edit the media item (public name, thumbnail image, Bible reference, and tags)
2) Make a copy of the item (only for images)
3) View usage – where the media is displayed on the website
4) Delete the item
4. Your media items can now be inserted on a page.
E. Media item tags and Scripture references
1. Tags and Scripture references present a convenient way to identify your media items so that they are easier to sort, filter, and use.
2. You are given the opportunity to add a Scripture reference and tags when you add certain items to the Media Library.
3. You may edit items in the Media Library to add (or change) a Scripture reference and tags.
4. On the Media Library chart, click on Edit at the far right of the listing.
5. A new screen displays the library record for the item.
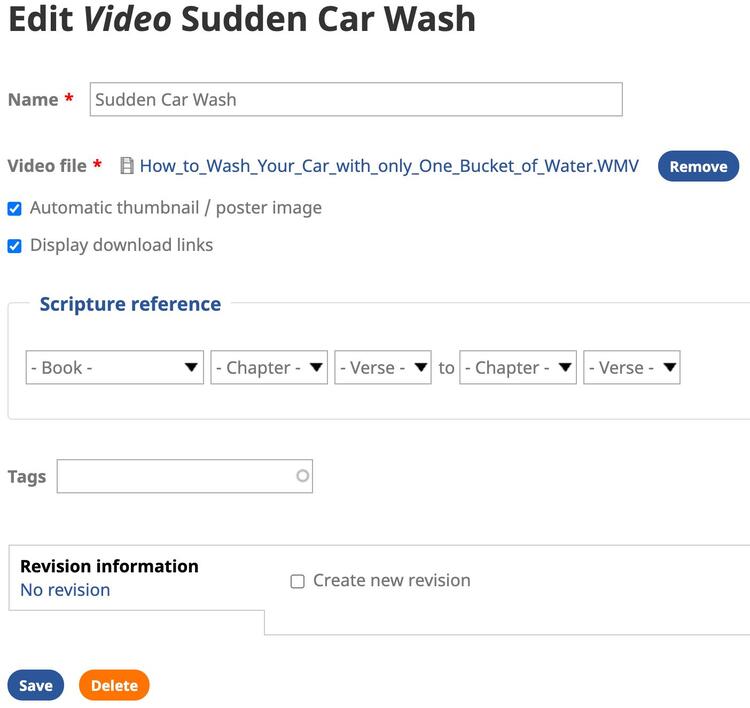
6. Depending on the type of media item, there are different elements to edit. They may include the following:
a) The public title in all default Navigation Languages.
b) Thumbnail image (audio):
1) Remove if already selected.
2) Choose File or Browse... to add.
c) Thumbnail image (video):
1) Check box to include Automatic thumbnail/poster image (may not be included with video).
2) Uncheck Automatic box to choose your own thumbnail image.
d) Uncheck the box if you do NOT want to display download links beneath the media player.
e) If a Scripture reference is applicable to the media item, click on the drop-down lists and select Bible Book, beginning Chapter, beginning Verse, ending Chapter, and ending Verse.
f) In the space provided, write Tags – one-word or short phrase descriptions of the item to help you filter and sort your Media Library.
1) Separate tags with commas.
2) Note: You do not need to make tags for media type or Scripture reference, as these are already included in the library filter.
F. Media Library screen – other features
1. Add media button – another way to reach the Add media item screen
2. Filter – click on this link to open the library filter
a) Enter any combination of media name, type (category), tags, and Scripture reference, then click on the Filter button.
b) The Media Library chart will only show items that meet the filter criteria.
3. Bulk actions
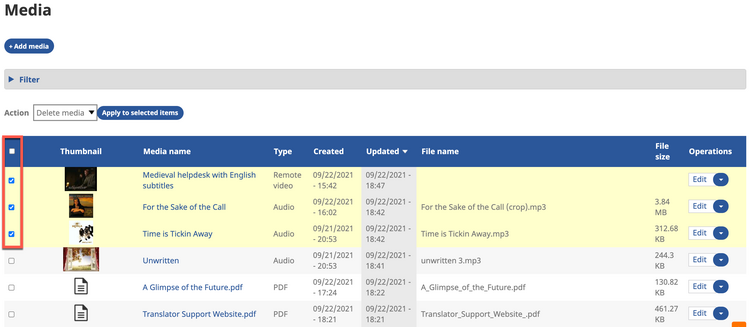
a) Use the check boxes on the left side of the Media Library chart to select items.
1) You may use the Filter first to sort items from the full library, then click on the check box on the blue header bar to select all filtered items at once.
b) Click on the drop-down list titled Action.
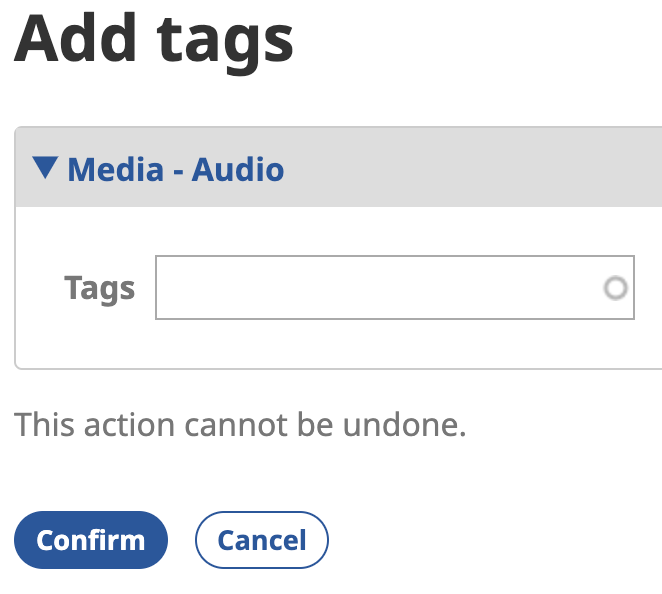
c) Select the desired action: Delete or Add tags.
d) Click on the button Apply to selected items.
e) If you selected Delete, the next screen asks you to confirm the action.
(1) Click on the desired button to confirm or cancel the action.
f) If you selected Add tags, the next screen gives you a space to write the tags.
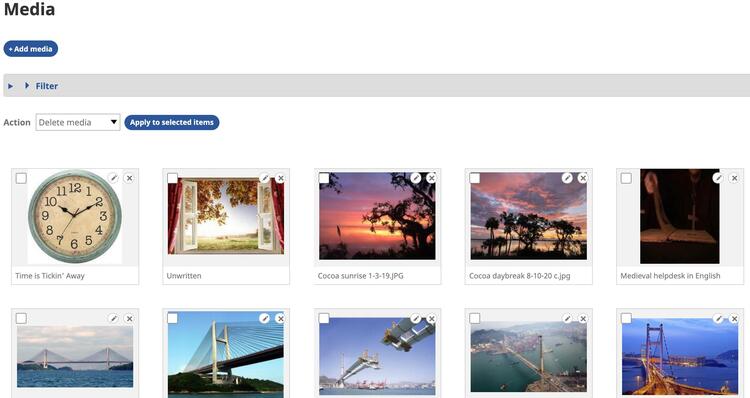
2. The Media Library changes from a chart display to a grid display.
a) The column information disappears.
b) Click on the small pencil icon in the upper right corner of an item to edit the item’s information.
c) Click on the X icon to delete an item.
d) The media filter and bulk actions are still active.
e) If you have many items in your Media Library, the grid display may take up several pages. Look at the center bottom of the grid for page navigation controls.
3. To return to the chart display, on the Wildfire menu, click on Work with Media, then click on Media library.
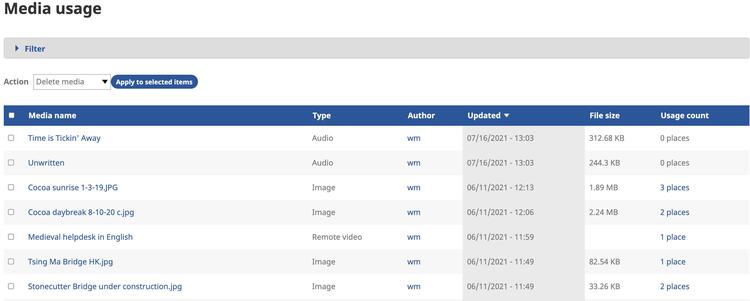
H. Media library – usage display
1. On the Wildfire menu, click on Work with Media, hover over Media library, then click on Media usage.
2. The Media Library changes from the standard chart to a simplified chart.
a) The far-right column, Usage count, shows the number of places on the website where each item is used.
b) Click on a usage count to access more details for a specific media item.
c) A new chart appears.
d) The column Entity on the left lists the page(s) where the item is used.
e) The column Status on the right indicates whether the page is published or not.
3. To return to the standard chart display, on the Wildfire menu, click on Work with Media, then click on Media library.
I. Media duplicates
If you upload a lot of items to your Media Library, it is very possible to upload the same item more than once and have duplicates in your library. It is a good idea to check your library every now and then and delete such duplicates.
The Media duplicates screen helps you with this task.
1. On the Wildfire menu, click on Work with Media, hover over Media library, then click on Media duplicates.
2. If you have any media duplicates, they will be listed on the next screen.
a) If you have no duplicates, there will be a message to that effect on this screen.
3. Click on a blue media item title in the column Entities.
4. The Edit screen opens for the item selected.
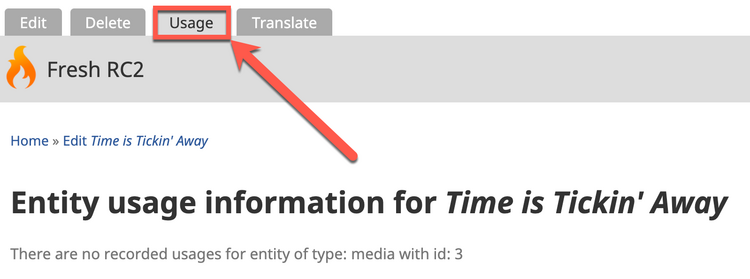
5. Click on the tab Usage at the upper left.
6. If the item is shown as being used on a web page, do not delete it. Go back to the Media duplicates screen and check the other item shown.
7. If the item is not being used, you may safely delete it by clicking on the tab Delete on the upper left.
J. Encoding queue
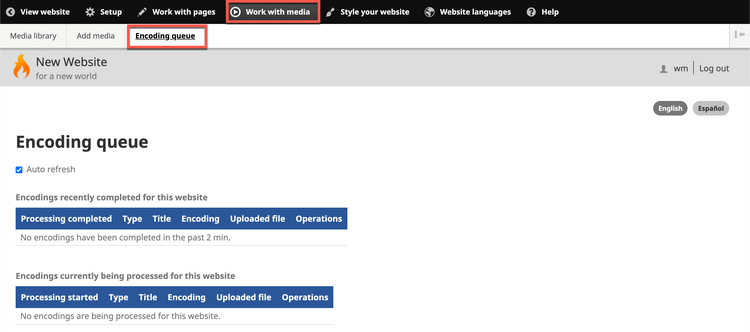
1. You may upload large media files, place them on a page, and find that they won’t play right away.
2. The Encoding queue shows you if files are still being encoded by the system. They will not play on a page until they are fully encoded.
3. On the Wildfire menu, click on Work with Media, then click on Encoding queue.
4. There are four charts on the screen which show stages of the encoding process:
Encodings recently completed for this website
Encodings currently being processed for this website
Encoding queue for this website
Failed encodings
5. These charts are for information only.

