Intitial Setup Guide
Click on a section title to jump down the web-page:
A. Introduction
B. Begin the Initial Setup Guide
C. Add Navigation Languages
D. Set default language
E. Enable and disable languages
F. Sort languages
G. Choose a theme
H. Choose a color scheme
I. Upload distinct fonts
J. Assign fonts
K. Create a website name and slogan
L. End of Initial Setup Guide
A. Introduction
1. The Initial Setup Guide configures some of the basic elements of your website. In some cases, a Kalaam Media staff member will have already run the Initial Setup Guide on your behalf. In other cases, you will need to run it yourself. Either way, you may proceed through the Initial Setup Guide, even if it’s been already done. You may return to it at any time to change your configuration.
2. IMPORTANT: In a workshop, while all team members can participate in making decisions, only one team member should work through these steps on the website.
3. Some of the steps in the Initial Setup Guide are required; others are optional and have a button to Skip this step.
4. All choices made in the Initial Setup Guide can later be changed.
B. Begin the Initial Setup Guide
1. Click on the menu item Setup. You will return to the Welcome screen.
1. You can review an explanation of Publication and Navigation Languages in Unit 01, Chapter 4, Section B.
2. Each Wildfire website is created with English as a Navigation Language. If you will not be using English on your website, ask your Digital Publishing Manager for help.
3. Add a language already in Wildfire.
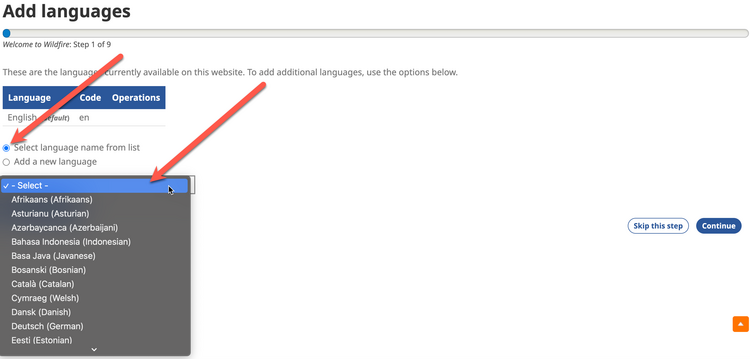
a) Select the radio button Select language name from list.
b) Click on the drop-down menu and scroll through the list of languages already in the Wildfire system. If your language is not listed, go to Step 4 below.
(Note that languages are listed in alphabetical order by their native names. For example, German is listed as Deutsch, and Spanish is listed as Español.)
c) Select your desired language, then click on the Add this language button at the bottom of the screen.
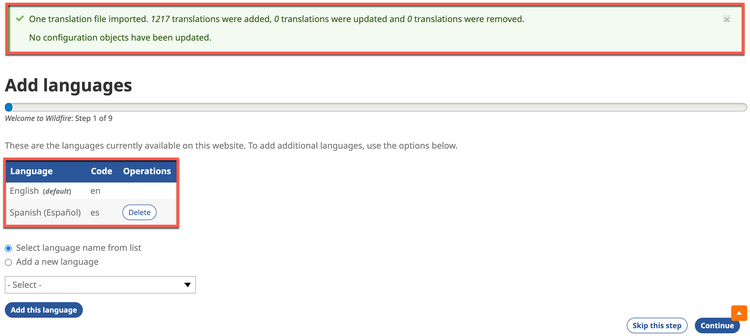
d) It may take a few minutes for the system to import interface translations, and then you will be returned to the Add languages screen.
A confirmation message appears at the top, and you will now see the new Navigation Language listed on the language chart.
Note that the number of translations may be different for the language(s) that you add.
4. Add a language not currently in Wildfire.
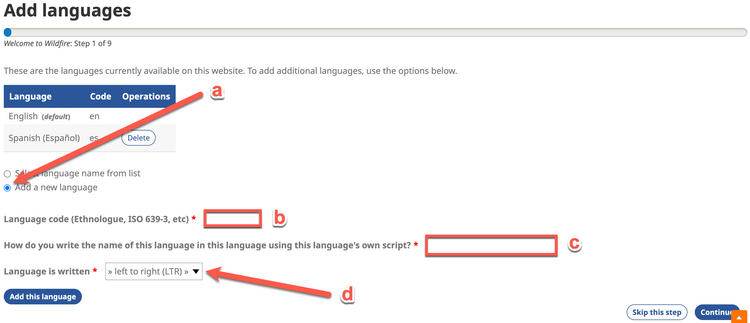
a) Select the radio button Add a new language.
b) Fill in the 3-letter language code.
c) Write what this language is called in the language itself, using the script in which the language is written.
d) Select if the language is written left-to-right or right-to-left.
e) Click on the Add this language button.
5. To add additional languages, repeat the appropriate steps above.
6. If you find that you have added the wrong language by mistake, you will be able to delete it on the next screen.
7. When finished, click on the Continue button at the bottom right.
D. Set default language
1. A chart appears listing all the Navigation Languages for your website.
a) In the column labeled Default, select the Navigation Language that you want to work in to build the website. This may or may not be your Publication Language.
b) IMPORTANT: Choose the language you are most comfortable using to build the website. All the pages in the other Navigation Languages will be translations of this one. You can still set one of the other languages to be the first one that website visitors see when they go to your website. Ask your Digital Publishing Manager if you need help with this.
2. If you added the wrong language by mistake in the previous step, remove it here by clicking on the drop-down list Edit on the appropriate row of the chart, then selecting Delete.
3. If you need to return to the screen Add languages, use your browser’s Back button.
4. Click on the Save and continue button at the bottom right.
E. Enable and disable languages
1. A chart appears listing all the Navigation Languages for your website.

2. In the column titled Enabled, click on the checkbox to disable a language (if already checked) or enable a language (if not checked).
a) The Default language (selected in the previous step) is grayed out and cannot be disabled.
3. Click on the Save and continue button at the bottom right.
F. Sort languages
1. Another chart appears, allowing you to change the order of the Navigation Languages. This determines the position of the languages on certain working screens and in the language switcher buttons on the website.
2. To change the position of a language on the chart:
a) Move the mouse cursor over the four-pointed arrow to the left of that language name.
b) Click and hold, then move the cursor up or down to the desired position.
c) Release the click. A message appears, prompting you to save your changes.
3. When you have made all the desired changes in language order, click on the Save and continue button at the bottom right.
G. Choose a theme
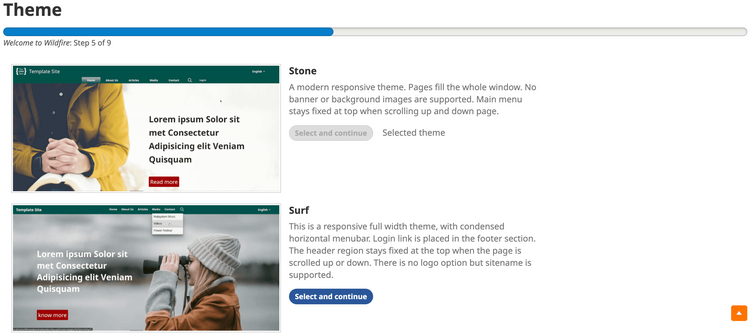
1. There are currently four choices on the Theme screen.
a) Stone – The horizontal menu remains fixed at the top of the screen when scrolling up and down website pages.
b) Surf – A condensed horizontal menu remains fixed at the top of the screen. Website logo is not supported. Log-in link moves to the website footer section.
c) Tide – The menu hides when you scroll down a website page and returns when you scroll back to the top.
d) Tower – A sidebar (vertical) menu pops out on the left when you click on the “hamburger” icon at the top left of the screen. Log-in link and search field are also in the pop-out.
2. Leave the default setting (Stone) or click on the blue Select and Continue button next to another theme to select it instead.
3. Click on the Continue button at the bottom right if you are not choosing a different theme.
H. Choose a color scheme
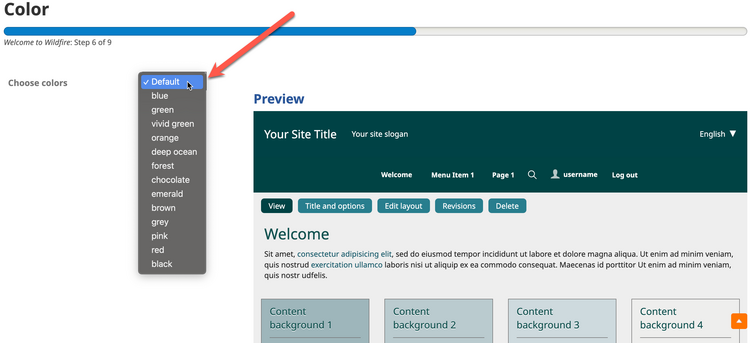
1. Each theme has a default color scheme, as shown in the preview image on this screen. You may change the color scheme by selecting from the options.
(You may Skip this step by clicking on the button at the bottom right and come back to it later.)
17. Select a color scheme
a) Click on the drop-down list.
b) Click on a color scheme. The preview image changes.
2. After making your selection, click on the Save and continue button at the bottom right.
3. NOTE: Each color scheme follows a theme. If you change your theme, double-check that your preferred color scheme is selected.
I. Upload distinct fonts
1. You may require a specific (distinct) font for your language to display correctly on the website.
(You may Skip this step by clicking on the button at the bottom right and come back to it later.)
2. Click on the Choose file or Browse… button.
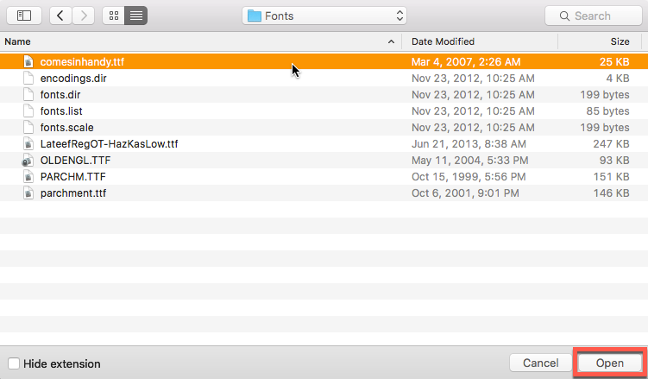
3. A new window opens which allows you to search for the font file on your computer.
a) Select the desired file (allowed file types are .ttf and .woff).
b) Click on the Open button. The filename will replace the Choose file or Browse… button.
1. The default Wildfire font is called “Noto”. You may change the font.
(You may Skip this step by clicking on the button at the bottom right and come back to it later.)
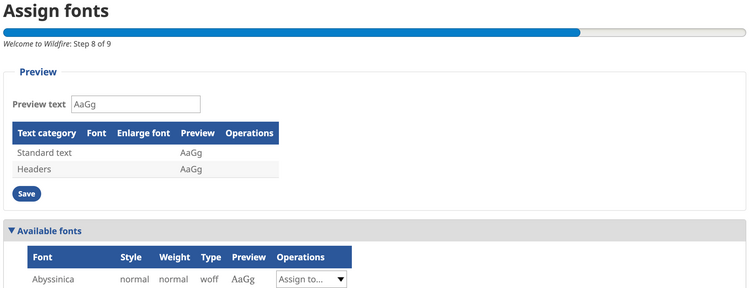
2. You are allowed to select two font styles, one each for different elements of the website.
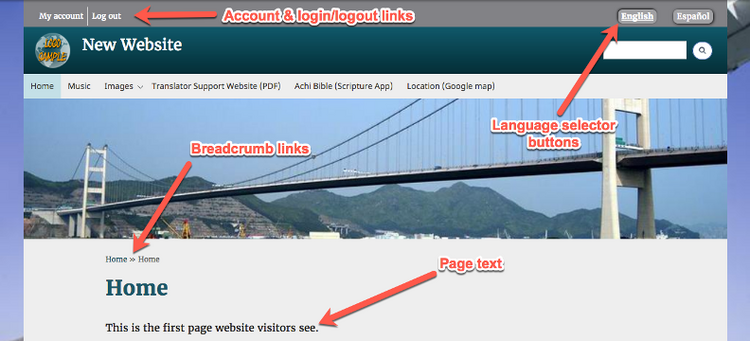
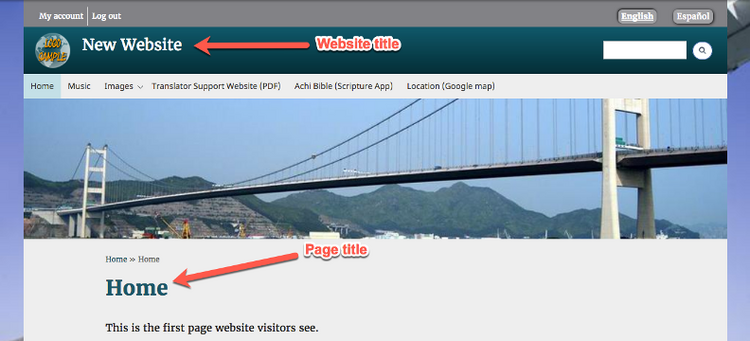
a) Standard text: This is the “normal” text on web pages; it is the text in the language selector buttons; it is the text in the footer section; it is the text in the account and login/logout links; and it is the text used for the “breadcrumbs”.
b) Header: This is the text for page titles; it is the text for the website title in the banner; and it is the text in the “Heading” category of the text editor.
3. Many font choices are listed in the chart Available fonts, including any distinct fonts that you uploaded on the previous screen.
4. Review the font options and make your selection for Standard Text.
a) Scroll through the list of fonts shown in the chart Available fonts to find the one you want.
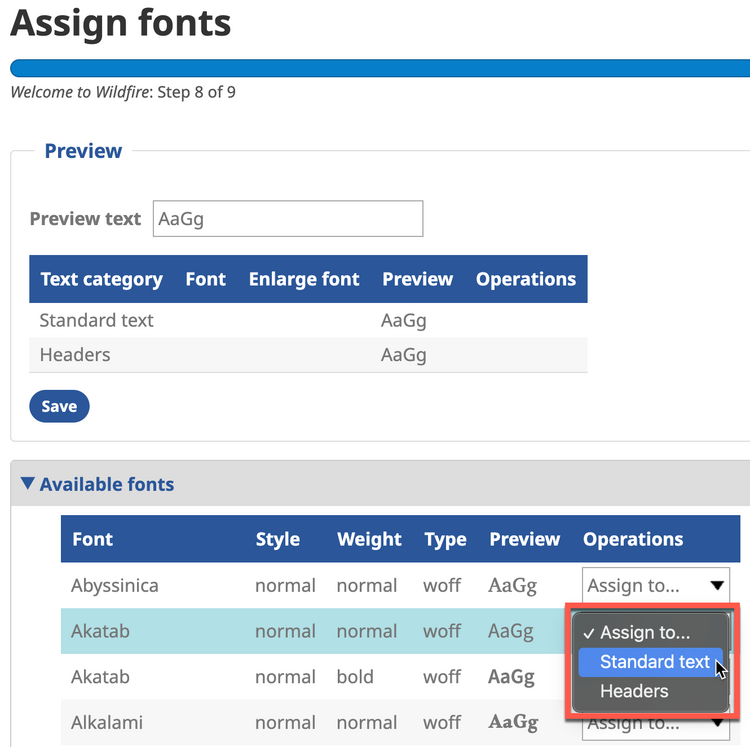
b) Click on the drop-down menu Assign to… in the column Operations to assign this font.
c) Select Standard text.
d) To save your choice and stay on this screen, click on the Save button at the bottom left of the Assign fonts screen. This allows you to try different fonts before moving off this screen.
e) Repeat step 3 to select a font for Headers. You may choose the same font for both Standard text and Headers, or you may choose different fonts for each.
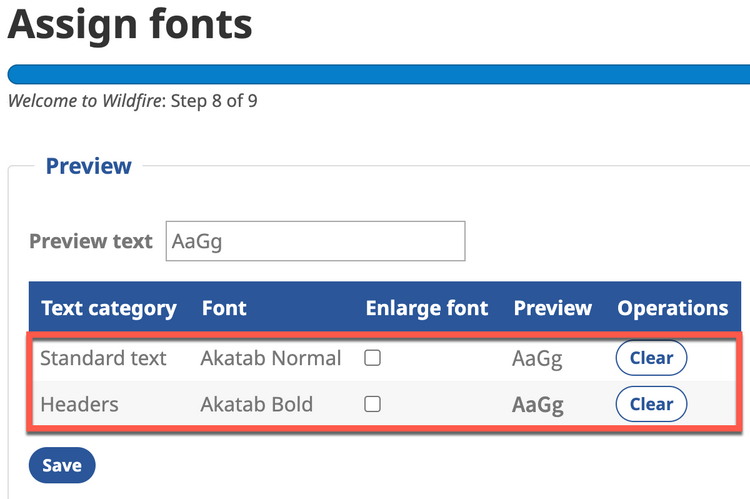
5. Your font choices appear in the preview chart at the top of the screen.
6. Your language may need a distinct font to display text properly on your website. If so, you uploaded a distinct font in the previous step of the Initial Setup Guide. Now let’s make sure text is displaying properly in that font.
a) Near the top of the Font screen, in the section titled Preview, there is a field titled Preview text.
b) The default Preview text is AaGg. This is repeated next to each font in both the Preview section and the larger font chart below.
c) The letters AaGg most likely will not adequately display the features of the distinct font that you have uploaded and selected for your website.
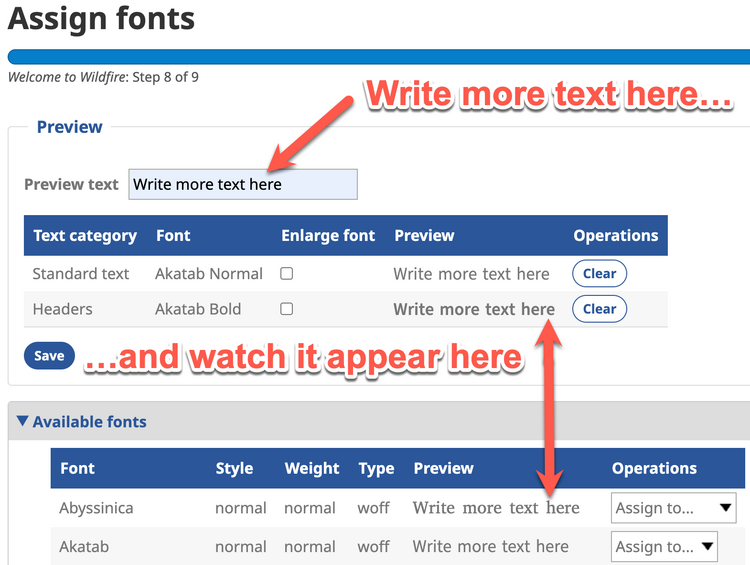
d) Type a longer text in the Preview text field, being sure to include characters that use the full features of your distinct font.
e) The font charts will immediately show each font using the new preview text.
7. If you decide that you prefer the default theme font, simply click on the Clear button in the font preview chart.
8. If you make any changes in the Preview section, click on the Save button at bottom left.
9. When you have completed your font selections, click on the Save and continue button at the bottom right.
K. Create a website name and slogan
1. Enter a website name (title) in each of the Navigation Languages.
This may be the domain name for your website, or it may be another name of your choice.
(You may Skip this step by clicking on the button at the bottom left and come back to it later.)
a) Leave the box checked next to Show website name at the top of website pages.
b) Type the website name in the appropriate field for each Navigation Language.
The website name should mean the same thing in all the Navigation Languages, translating the words as needed.
2. You may also display a website slogan. This is a short phrase that appears beneath the website name and tells visitors more about your website. The slogan is optional.
a) Check the box next to Show website slogan at the top of website pages.
b) Type the slogan in the appropriate field for each Navigation Language.
The website slogan should mean the same thing in all the Navigation Languages, translating the words as needed.
3. Click on the Save and continue button at the bottom right.
L. End of Initial Setup Guide
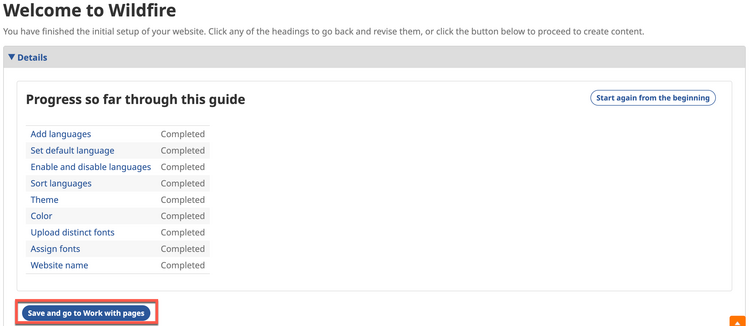
1. You have now completed (or chosen to skip) the steps in the Wildfire Initial Setup Guide.
2. You have three choices at this point.
a) You may go back through the entire Initial Setup Guide by clicking on the button Start again from the beginning. (This is rarely needed.)
b) You may move on to create website content by clicking on the button Save and go to Work with pages at the bottom right. (Normal option)
c) You may go back to a specific step of the Initial Setup Guide by clicking on the title of that step written in blue text.
(If you skipped a step while using the guide, the chart will show “Skipped” instead of “Completed”.)
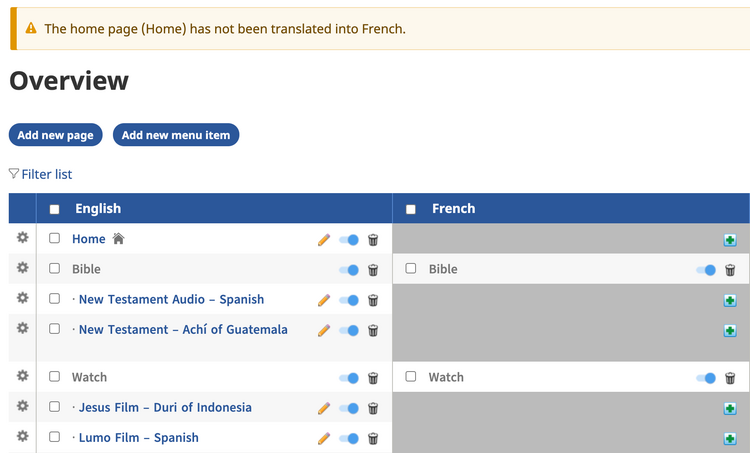
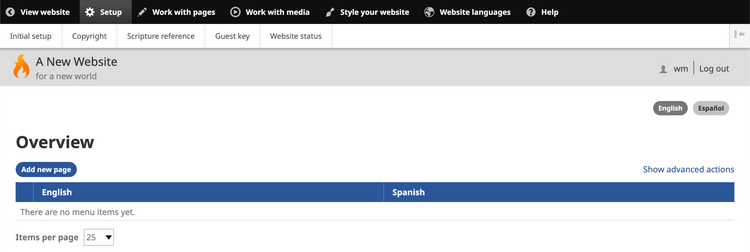
3. After clicking on the button Save and go to Work with pages, you will arrive at the website Overview screen.
a) If you started with a template website, the Overview screen will already show several pages on the website.
1) If you added a new Navigation Language in the Initial Setup Guide, you will see a column for that language with no page titles listed.
b) If you started with a blank website, the Overview screen will not yet show any pages.
4. You will see that the topmost, black bar now has various menu items; that is the Wildfire Menu. We will learn about that in Chapter 4.


